Tasks List - Common & Visual Tasks List
What Are Tasks?
Main Objective For Crewmates

Tasks are short mini-games which Crewmates need to complete in order to win the game. A task gauge is displayed in the upper-left corner and will increase whenever a Crewmate completes a task. Once the gauge is full, the Crewmate team wins!
Even if you're killed by an Imposter, you can still contribute to your team by completing tasks while dead! Don't just float there helplessly - help out!You Can Complete Task As A Ghost
Practice Tasks In Freeplay Mode

If you are not familiar with tasks, you can practice by yourself in Freeplay mode. Select the task you want to practice from the laptop in the Cafeteria and select Customize. Get to know each map and where to go before playing with others online!
Visual Tasks
What Are Visual Tasks?

Visual tasks are just like regular tasks, except players that are around you can if you have successfully done these tasks. This means that if you're an imposter and are faking doing a task, you will give yourself away by doing these tasks. Avoid them!
List Of Visual (Visible) Tasks
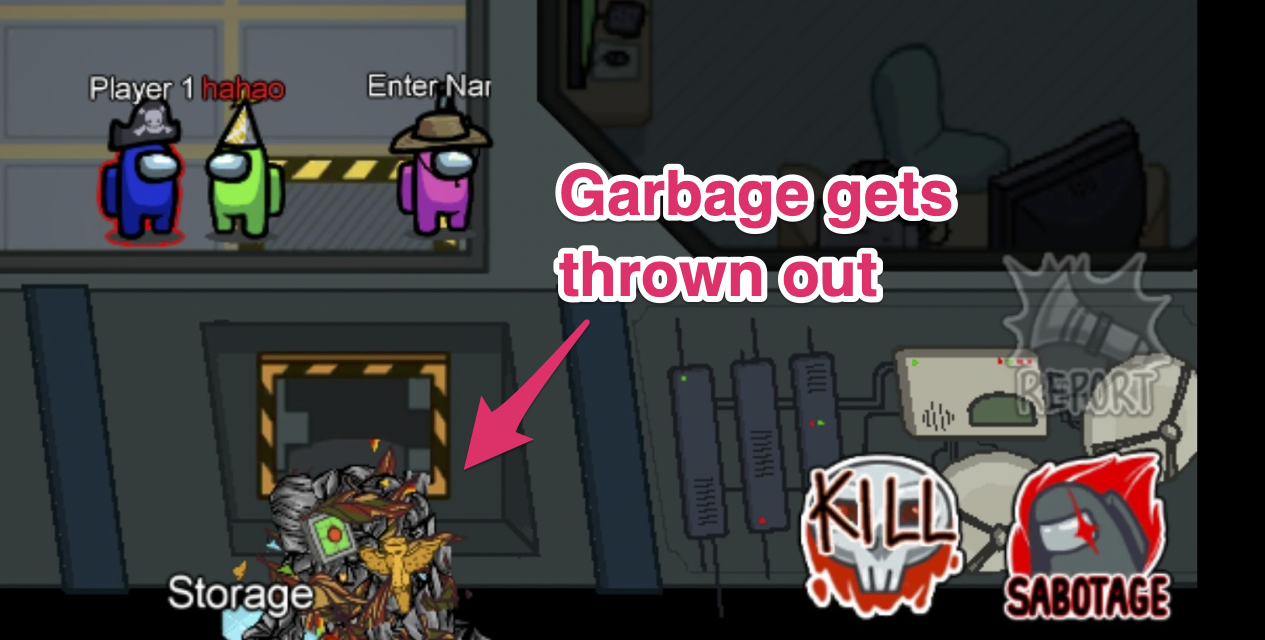
| Empty Chute |
|---|
Click to Enlarge Maps With This Visual Task:The Skeld Visual Effect: Garbage gets thrown out of the spaceship after completing the 2nd part of the task |
| Empty Garbage |
Click to Enlarge Maps With This Visual Task:The Skeld Visual Effect: Garbage gets thrown out of the spaceship after completing the 2nd part of the task |
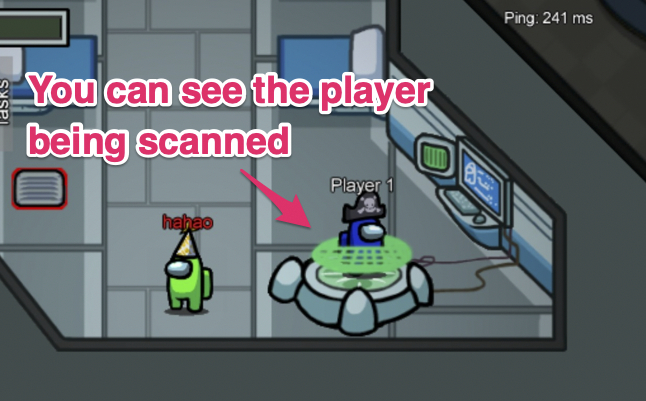
| Submit Scan |
Click to Enlarge Maps With This Visual Task:The Skeld, Mira HQ, Polus Visual Effect: A scanning animation appears while completing this task |
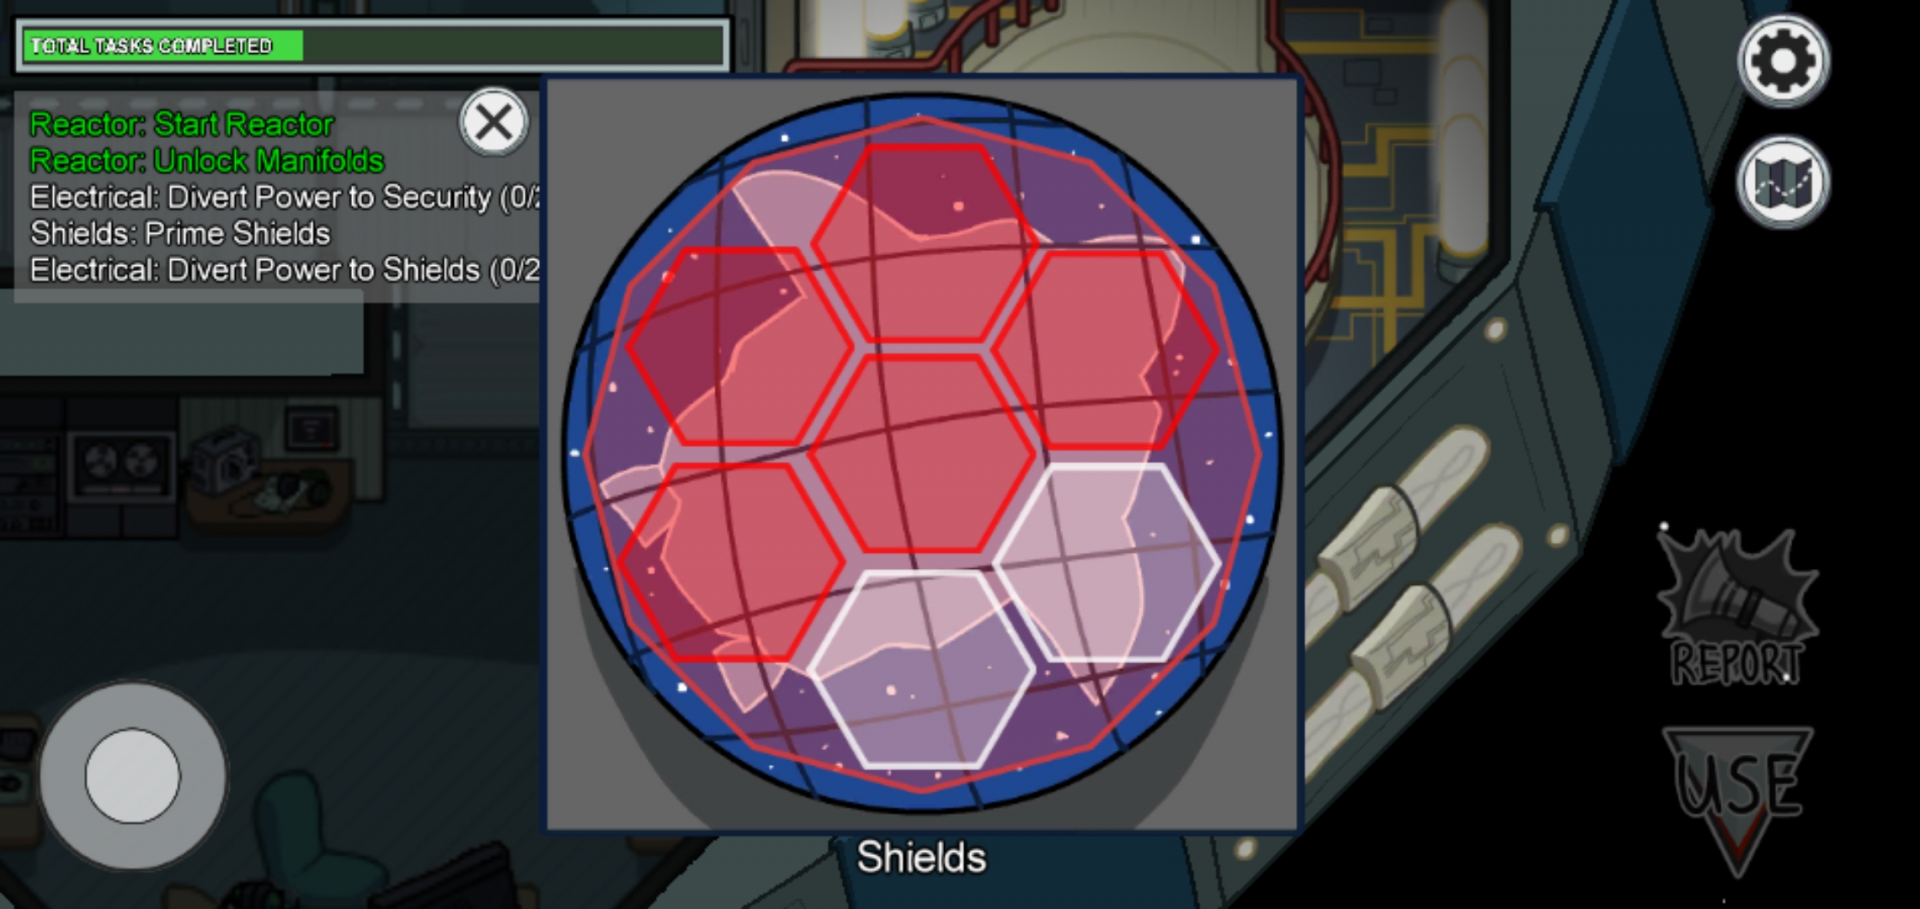
| Prime Shield |
Click to Enlarge Maps With This Visual Task:The Skeld Visual Effect: The wall of the spaceship lights up |
| Clear Asteroids |
Click to Enlarge Maps With This Visual Task:The Skeld, Polus Visual Effect: Laser beams shoot out from the spaceship cannon |


The Skeld - List Of All Tasks
| Align Engine Output |
|---|
Click to Enlarge Description:Move the arrow and align the center line with the green grid. Do the same thing in the other engine room. Location: Engines |
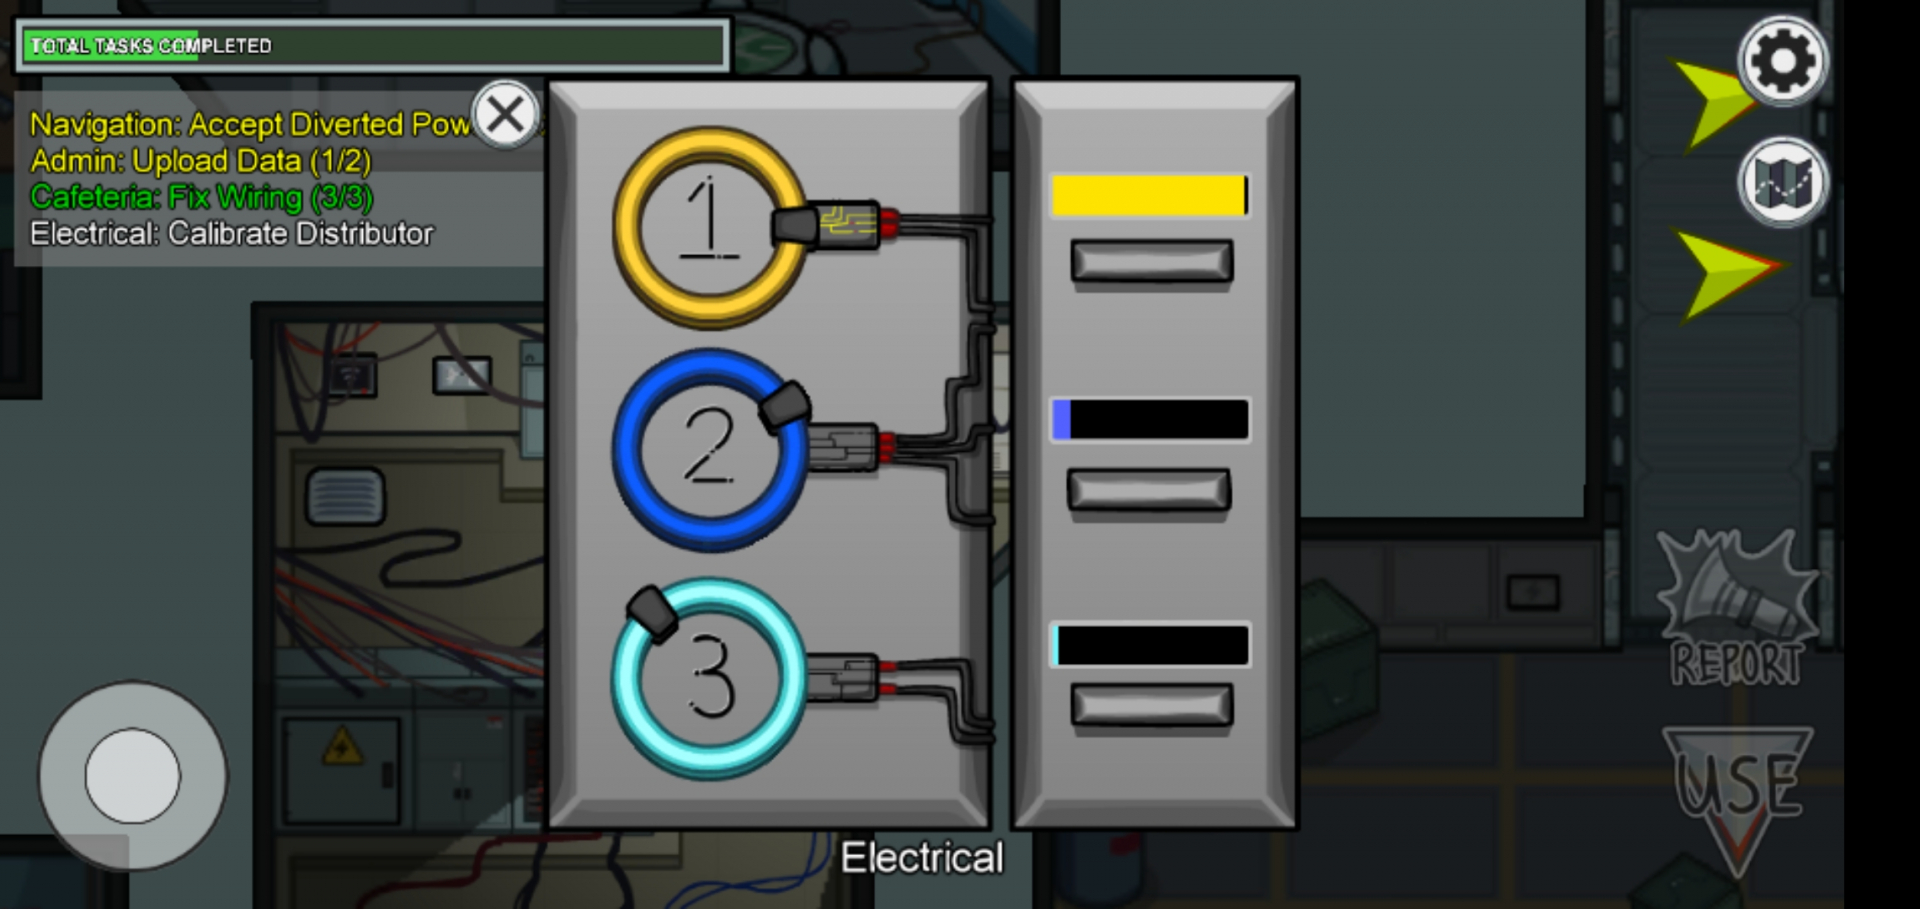
| Calibrate Distributor |
Click to Enlarge Description:Press the button below the meter in time so that the spinning black node connects with the device. Location: Electrical |
| Chart Course |
Click to Enlarge Description:Tap and drag the astronaut along the grid line. Location: Navigation |
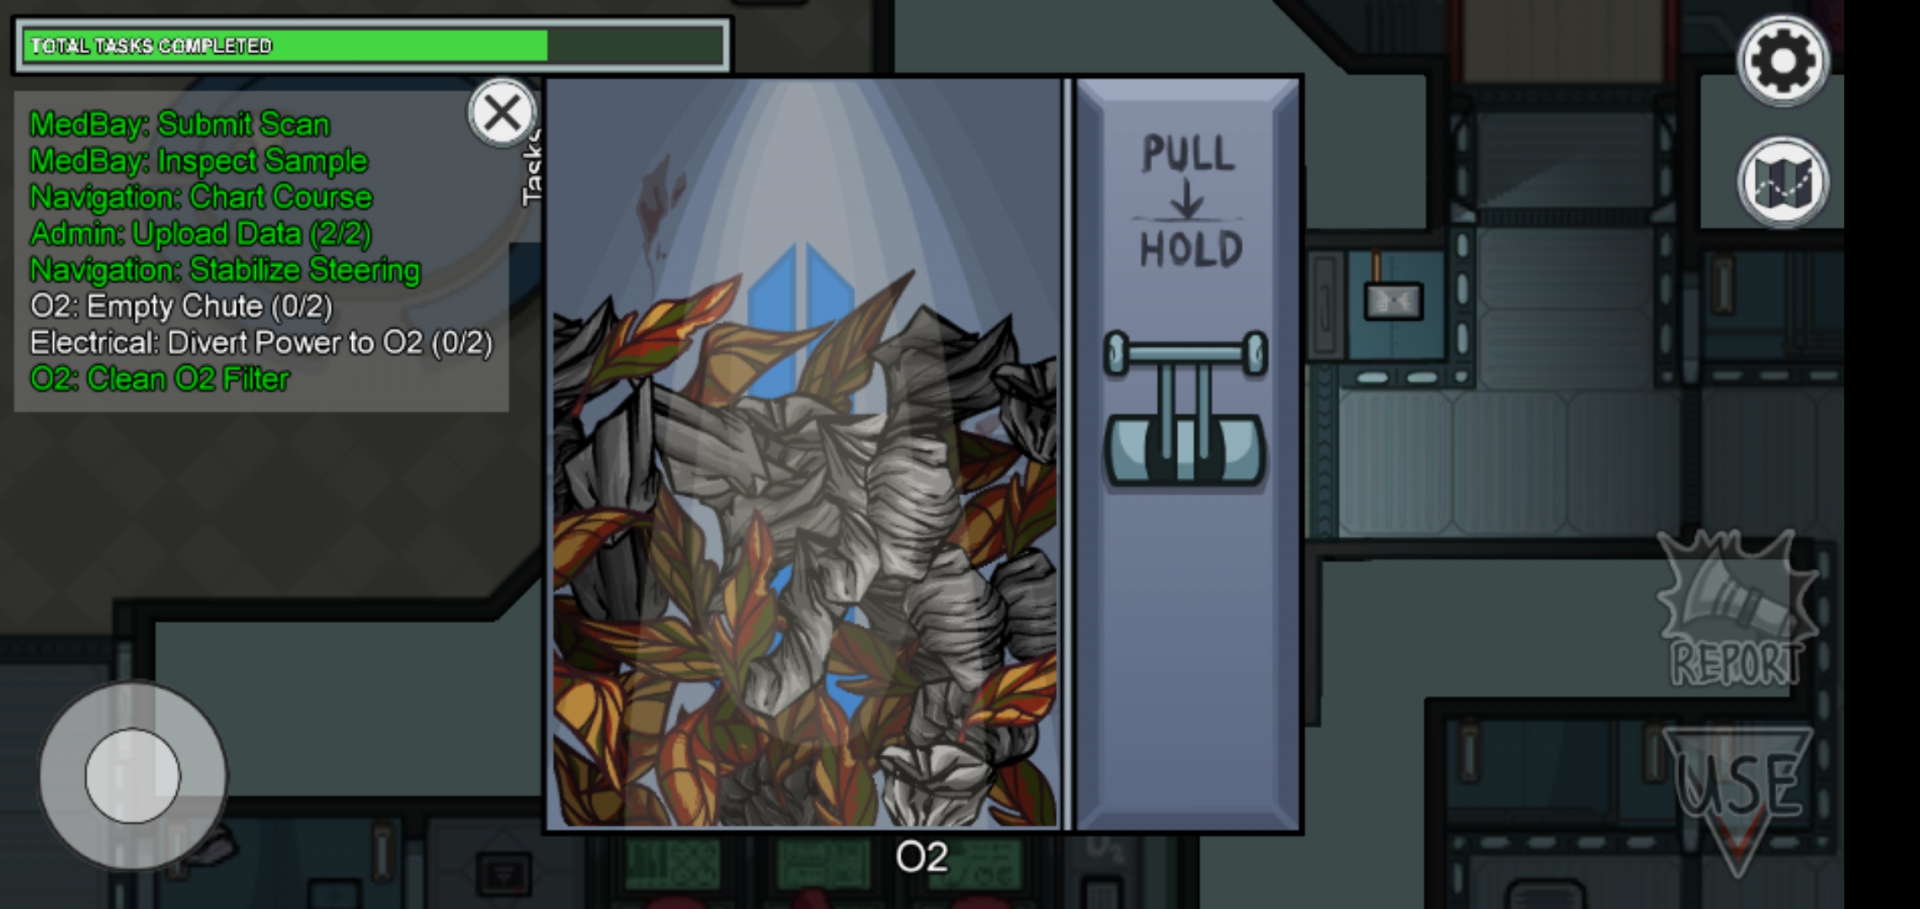
| Clean O2 Filter |
Click to Enlarge Description:Tap and drag the floating leaves toward the hole. Location: O2 |
| Clear Asteroids ! Visual Task ! |
Click to Enlarge Description:Tap and destroy 20 asteroids ⬆Click here to see the visual effect Location: Weapons |
| Divert Power to Communications |
Click to Enlarge Description:Pull up the glowing lever on the device. For The Skeld stage, move to Communications room and flip the switch in the center. Location: Electrical → Communications |
| Divert Power to Lower Engine |
Click to Enlarge Description:Pull up the glowing lever on the device. Move to the Lower Engine room and flip the switch in the center. Location: Electrical → Lower Engine |
| Divert Power to Navigation |
Click to Enlarge Description:Pull up the glowing lever on the device. Move to the Navigation room and flip the switch in the center. Location: Electrical → Navigation |
| Divert Power to O2 |
Click to Enlarge Description:Pull up the glowing lever on the device. Move to the O2 room and flip the switch in the center. Location: Electrical → O2 |
| Divert Power to Security |
Click to Enlarge Description:Pull up the glowing lever on the device. Move to the Security room and flip the switch in the center. Location: Electrical → Security |
| Divert Power to Shields |
Click to Enlarge Description:Pull up the glowing lever on the device. Move to the Shields room and flip the switch in the center. Location: Electrical → Shields |
| Divert Power to Upper Engine |
Click to Enlarge Description:Pull up the glowing lever on the device. Move to the Upper Engine room and flip the switch in the center. Location: Electrical → Upper Engines |
| Divert Power to Weapons |
Click to Enlarge Description:Pull up the glowing lever on the device. Move to the Weapons room and flip the switch in the center. Location: Electrical → Weapons |
| Empty Chute ! Visual Task ! |
Click to Enlarge Description:Pull and hold the lever. Move to a different location with a yellow arrow pointing to it and repeat. ⬆Click here to see the visual effect Location: O2 → Storage |
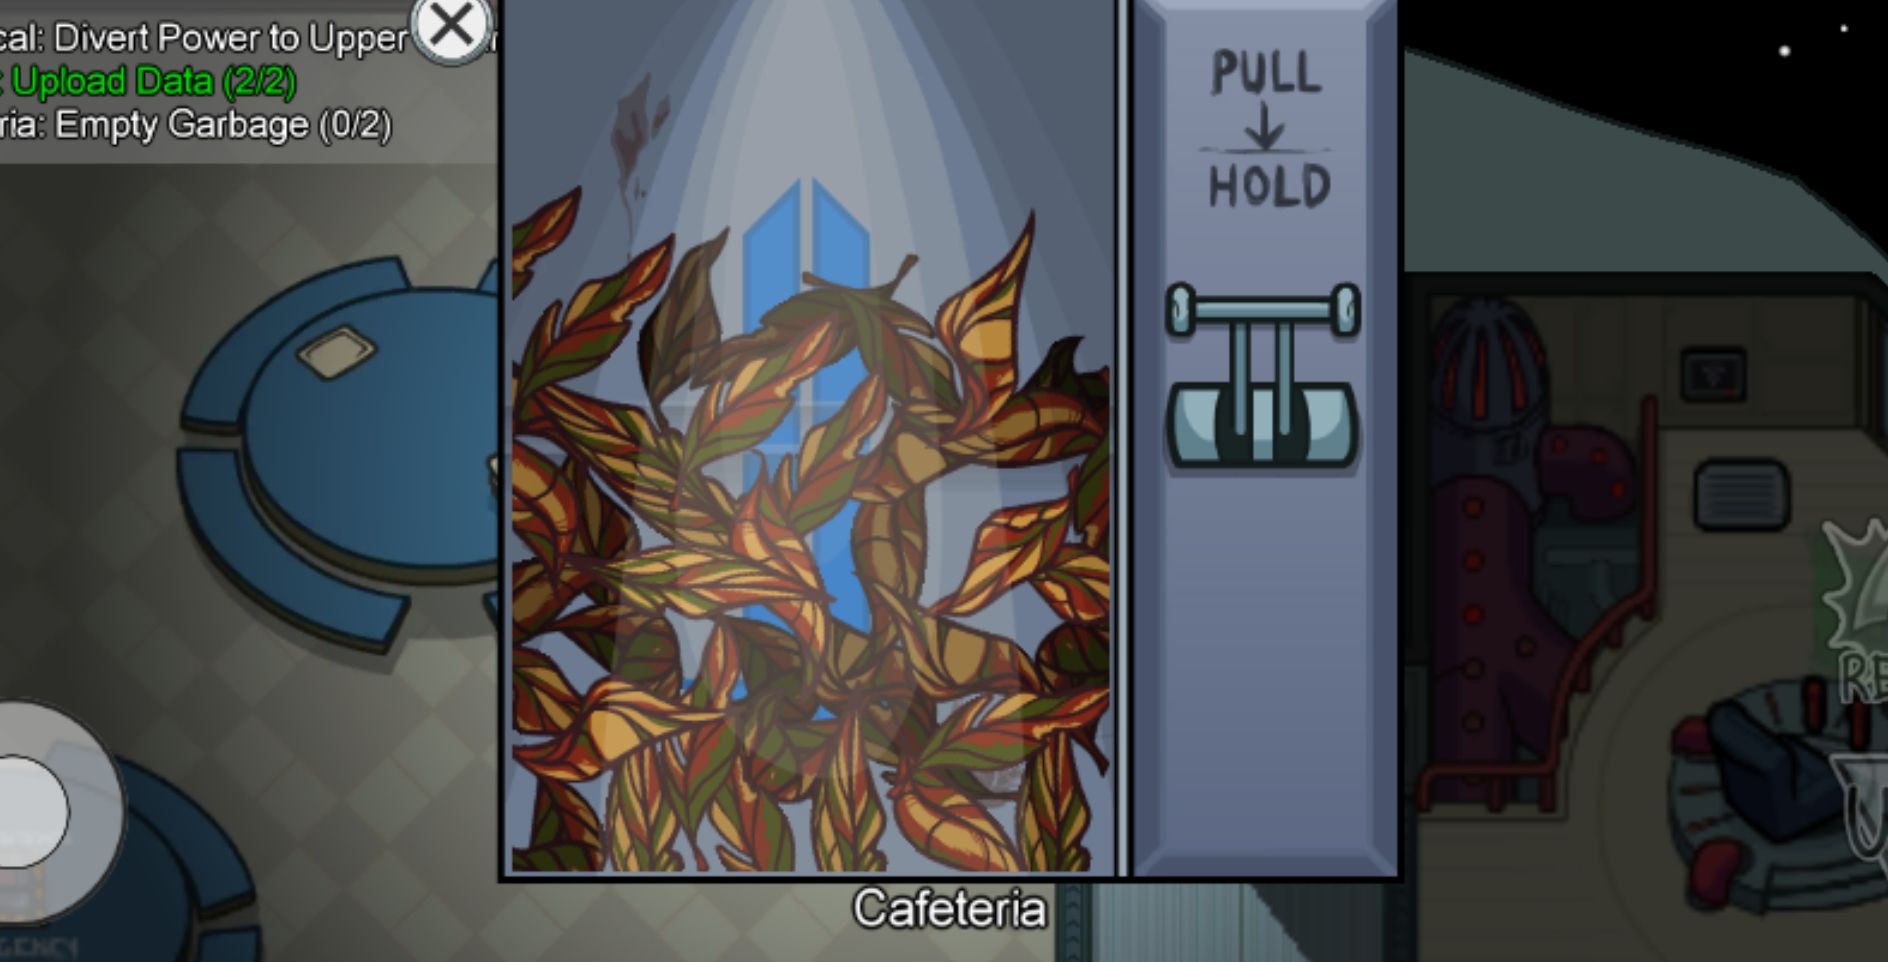
| Empty Garbage ! Visual Task ! |
Click to Enlarge Description:Pull and hold the lever. Move to a different location with a yellow arrow pointing to it and repeat. ⬆Click here to see the visual effect Location: Cafeteria → Storage |
| Fix Wiring |
Click to Enlarge Description:Connect wires of the same color. Fix 2 other locations. Location: Electrical → Storage → Cafeteria |
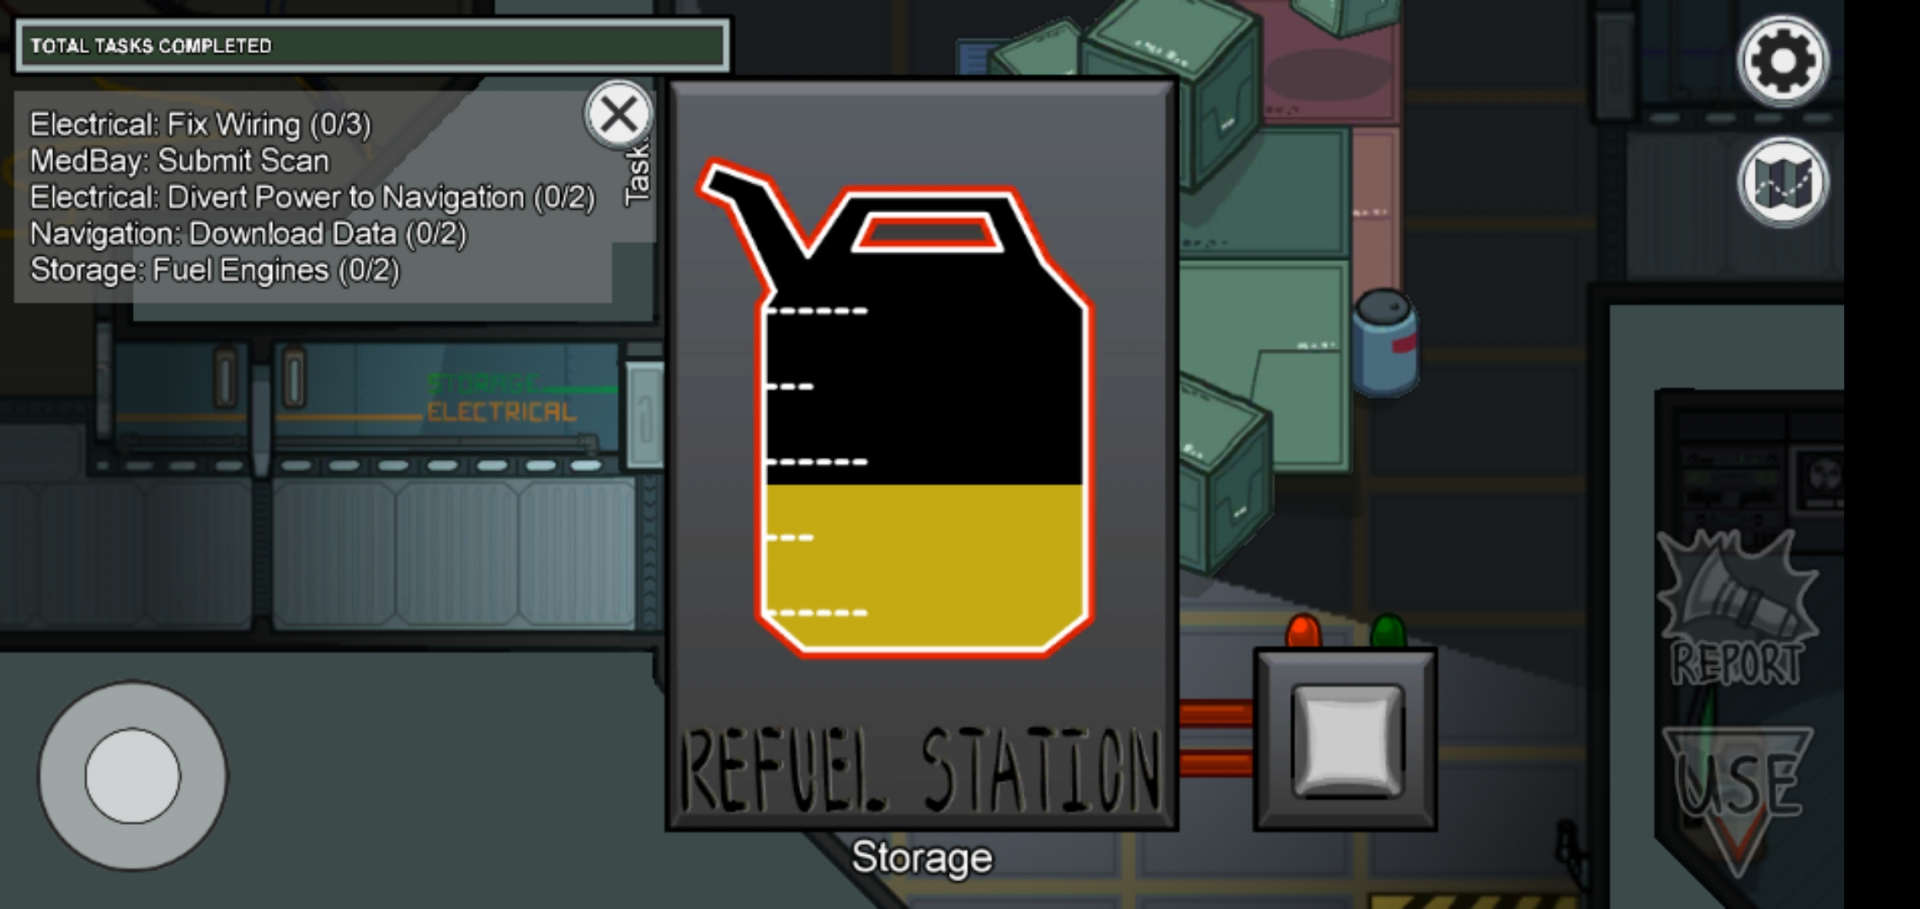
| Fuel Engines |
Click to Enlarge Description:Fill the gas tank by pressing and holding the button. For The Skeld & Polus stages, move to the location where the yellow arrow is pointing and fill the gas by pressing the button. Location: Storage → Engines |
| Inspect Sample |
Click to Enlarge Description:Press the start button and wait. Come back to the device when the countdown ends and push the button below the red sample. Location: MedBay |
| Prime Shield ! Visual Task ! |
Click to Enlarge Description:Tap the red cell and make all cells white. ⬆Click here to see the visual effect Location: Shields |
| Stabilize Steering |
Click to Enlarge Description:Move the cursor to the center Location: Navigation |
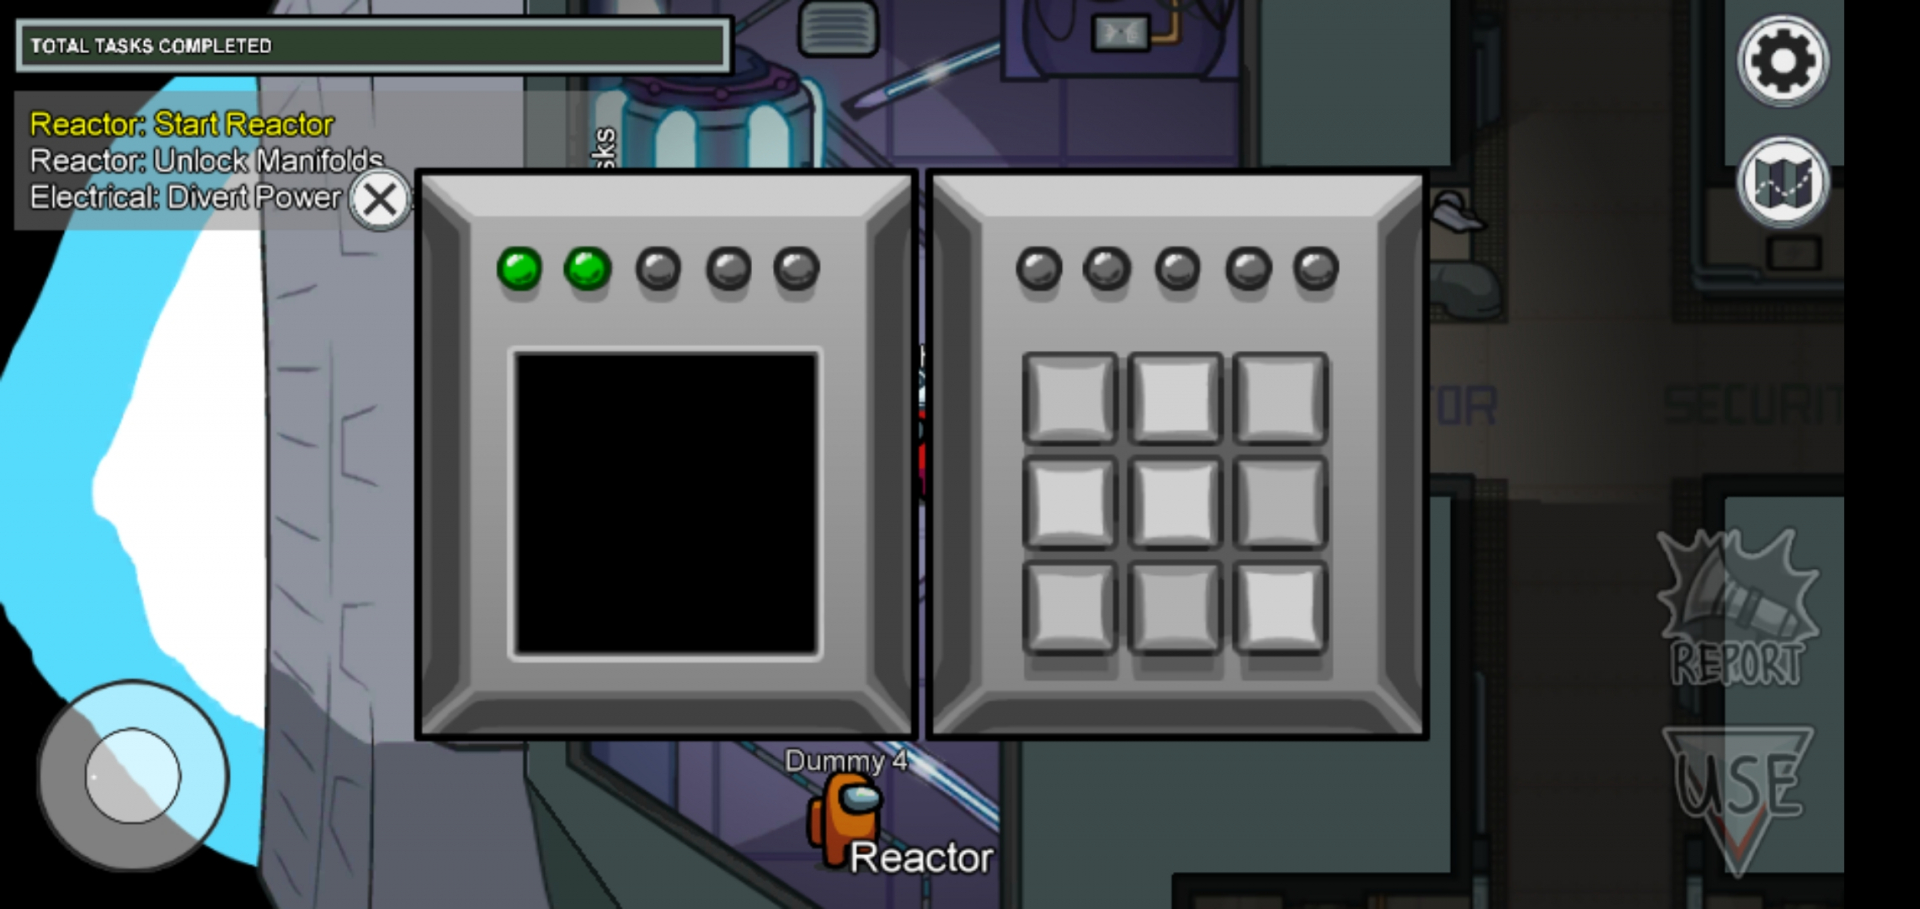
| Start Reactor |
Click to Enlarge Description:The blue square shows on the left display. Press the buttons in exactly same order as the blue squares. Location: Reactor |
| Submit Scan ! Visual Task ! |
Click to Enlarge Description:Stand on the platform and scan yourself. ⬆Click here to see the visual effect Location: MedBay |
| Swipe Card |
Click to Enlarge Description:Take out the card from your wallet and swipe it. Location: Admin |
| Unlock Manifolds |
Click to Enlarge Description:Press 1 ~ 10 buttons in numerical order. Location: Reactor |
| Upload Data |
Click to Enlarge Description:Press download button. Move to different location with yellow arrow pointing and upload the data. Location: Cafeteria → Admin Communication → Admin Electrical → Admin Navagation → Admin Weapons → Admin |


Mira HQ - List Of All Tasks
| Assemble Artifact |
|---|
Click to Enlarge Description:Fix the crystal like a jigsaw puzzle. Location: Laboratory |
| Buy Beverage |
Click to Enlarge Description:See the picture on right down corner and buy exactly same drink. Location: Cafeteria |
| Chart Course |
Click to Enlarge Description:Tap and drag the astronaut along the grid line. Location: Admin |
| Clean O2 Filter |
Click to Enlarge Description:Tap and drag the floating leaves toward the hole. Location: Greenhouse |
| Clear Asteroids |
Click to Enlarge Description:Tap and destroy 20 asteroids Location: Balcony |
| Divert Power to Admin |
Click to Enlarge Description:Pull up the glowing lever on the device. Move to Admin room and flip the switch in the center. Location: Reactor → Admin |
| Divert Power to Cafeteria |
Click to Enlarge Description:Pull up the glowing lever on the device. Move to Cafeteria and flip the switch in the center. Location: Reactor → Cafeteria |
| Divert Power to Communications |
Click to Enlarge Description:Pull up the glowing lever on the device. For The Skeld stage, move to Communications room and flip the switch in the center. Location: Reactor -> Communications |
| Divert Power to Greenhouse |
Click to Enlarge Description:Pull up the glowing lever on the device. Move to Greenhouse and flip the switch in the center. Location: Reactor → Greenhouse |
| Divert Power to Laboratory |
Click to Enlarge Description:Pull up the glowing lever on the device. Move to Laboratory and flip the switch in the center. Location: Reactor → Laboratory |
| Divert Power to Launchpad |
Click to Enlarge Description:Pull up the glowing lever on the device. Move to Launchpad and flip the switch in the center. Location: Reactor → Launchpad |
| Divert Power to MedBay |
Click to Enlarge Description:Pull up the glowing lever on the device. Move to Medbay and flip the switch in the center. Location: Reactor → MedBay |
| Divert Power to Office |
Click to Enlarge Description:Pull up the glowing lever on the device. Move to Office and flip the switch in the center. Location: Reactor → Office |
| Empty Garbage |
Click to Enlarge Description:Pull and hold the lever. Move to a different location with yellow arrow pointing and repeat. Location: Cafeteria |


| Enter Id Code |
|---|
Click to Enlarge Description:Take out the ID from your wallet and type in the ID code on the screen. Location: Admin |
| Fix Wiring |
Click to Enlarge Description:Connect the wires of the same color. Fix 2 other locations. Location: Storage -> Hallway -> Locker Room |
| Fuel Engines |
Click to Enlarge Description:Fill the gas tank by press hold the button. For The Skeld & Polus stage, move to the location where yellow arrow is pointing and fill the gas by pressing the button. Location: Launchpad |
| Measure Weather |
Click to Enlarge Description:Press the begin buton on right down corner and wait. Location: Balcony |
| Prime Shields |
Click to Enlarge Description:Tap the red cell and make all cells white. Location: Admin |
| Process Data |
Click to Enlarge Description:Simply press start button. Location: Office |
| Run Diagnostic |
Click to Enlarge Description:Press the red space key and wait until the countdown ends. Return to the device after the countdown and tp the red anomaly circle. Location: Launchpad |
| Sort Samples |
Click to Enlarge Description:Place the sample in the correct box. When you place a sample in right category, it should glow in blue. Location: Laboratory |
| Start Reactor |
Click to Enlarge Description:Blue squares appear on the left display. Press the buttons in exactly same order as the blue squares. Location: Reactor |
| Submit Scan ! Visual Task ! |
Click to Enlarge Description:Stand on the platform and scan yourself. ⬆Click here to see the visual effect Location: MedBay |
| Unlock Manifolds |
Click to Enlarge Description:Press the buttons 1 ~ 10 in standard numerical order. Location: Reactor |
| Water Plants |
Click to Enlarge Description:Find a watering can on the shelf and head to the Greenhouse to water plants. Location: Storage → Greenhouse |


Polus - List Of All Tasks
| Align Telescope |
|---|
Click to Enlarge Description:Tap the screen to toggle the telescope and find a planet displayed on the lower-right corner. Location: Laboratory |
| Clear Asteroids ! Visual Task ! |
Click to Enlarge Description:Tap and destroy 20 asteroids ⬆Click here to see the visual effect Location: Weapons |
| Empty Garbage |
Click to Enlarge Description:Pull and hold the lever. Move to a different location with a yellow arrow pointing to it and repeat. Location: O2 |
| Fill Canisters |
Click to Enlarge Description:Tap and drag down the canisters. Tap the canister again to fill the next bottle. Location: O2 |
| Fix Weather Node Node_CA |
Click to Enlarge Description:Drag the yellow light and reach the other end. Location: Outside |
| Fix Weather Node Node_GI |
Click to Enlarge Description:Drag the yellow light and reach the other end. Location: Outside |
| Fix Weather Node Node_IRO |
Click to Enlarge Description:Drag the yellow light and reach the other end. Location: Outside |
| Fix Weather Node Node_MLG |
Click to Enlarge Description:Drag the yellow light and reach the other end. Location: Outside |
| Fix Weather Node Node_PD |
Click to Enlarge Description:Drag the yellow light and reach the other end. Location: Outside |
| Fix Weather Node Node_TB |
Click to Enlarge Description:Drag the yellow light and reach the other end. Location: Outside |
| Fix Wiring |
Click to Enlarge Description:Connect wires of the same color. Fix 2 other locations. Location: Electrical -> O2 -> Office |
| Fuel Engines |
Click to Enlarge Description:Fill the gas tank by pressing and holding the button. For The Skeld & Polus stage, move to the location where yellow arrow is pointing and fill the gas by pressing the button. Location: Storage -> Outside |
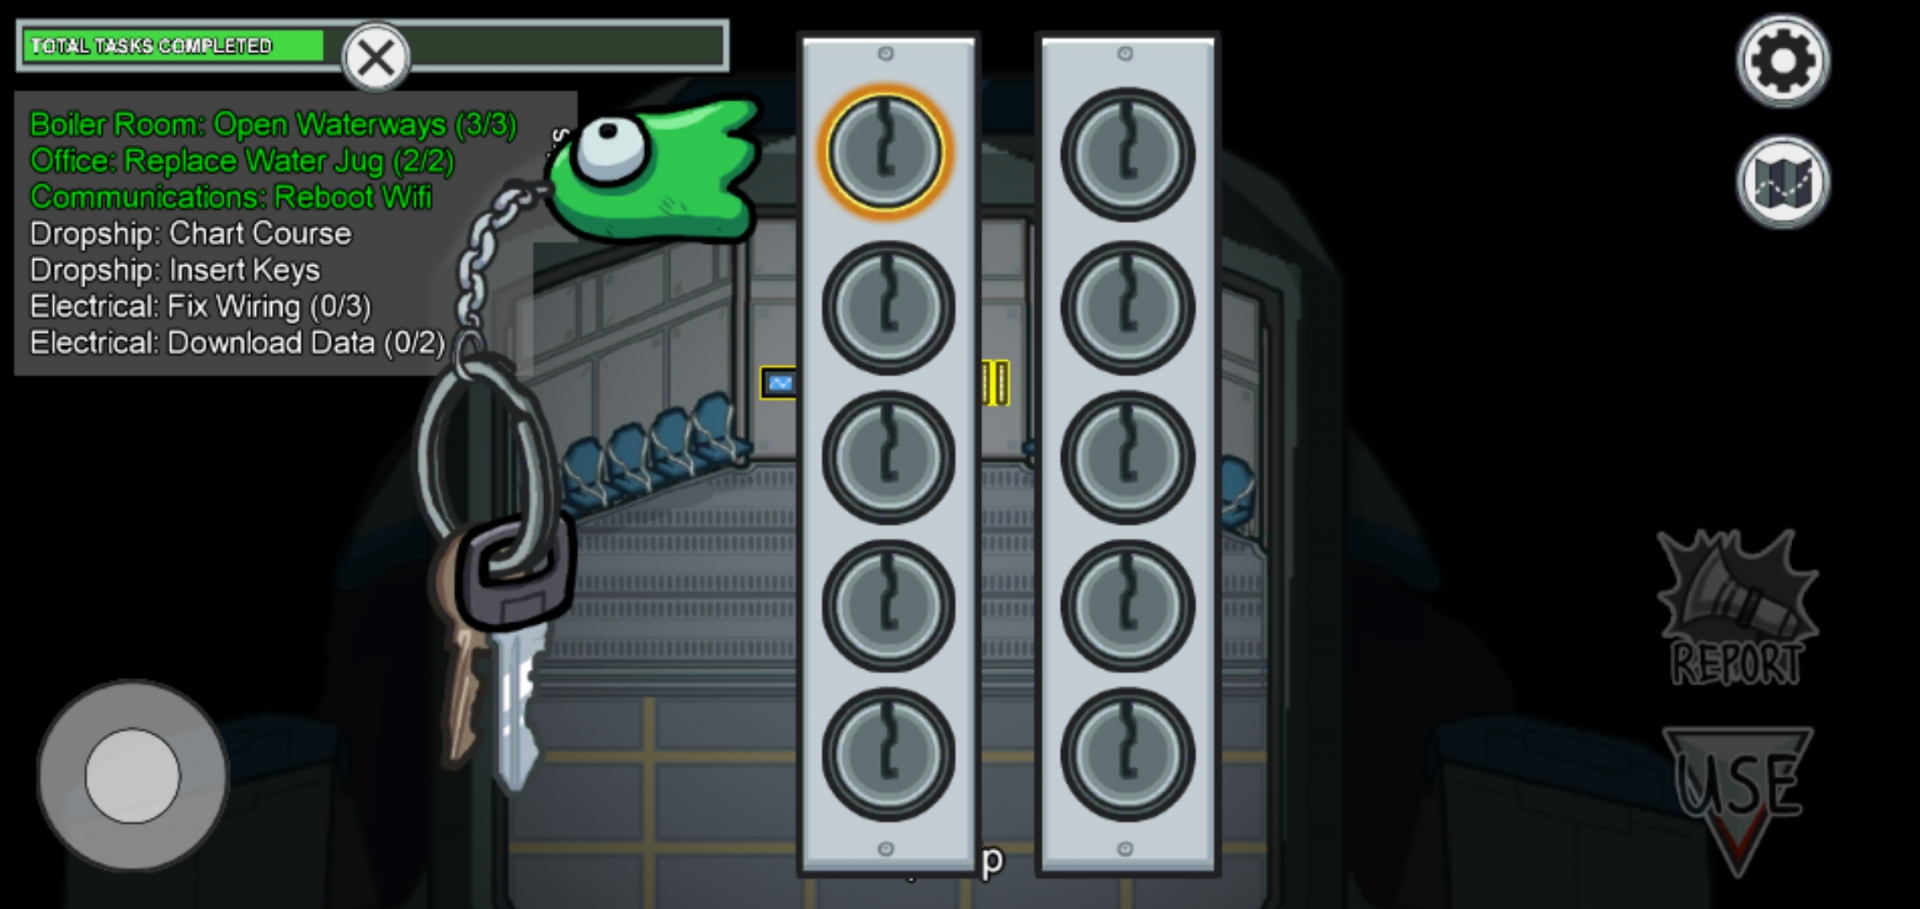
| Insert Keys |
Click to Enlarge Description:Insert a key and tap the key to turn it. Location: Dropship |
| Monitor Tree |
Click to Enlarge Description:Move the bars to align with the grid lines. Location: O2 |
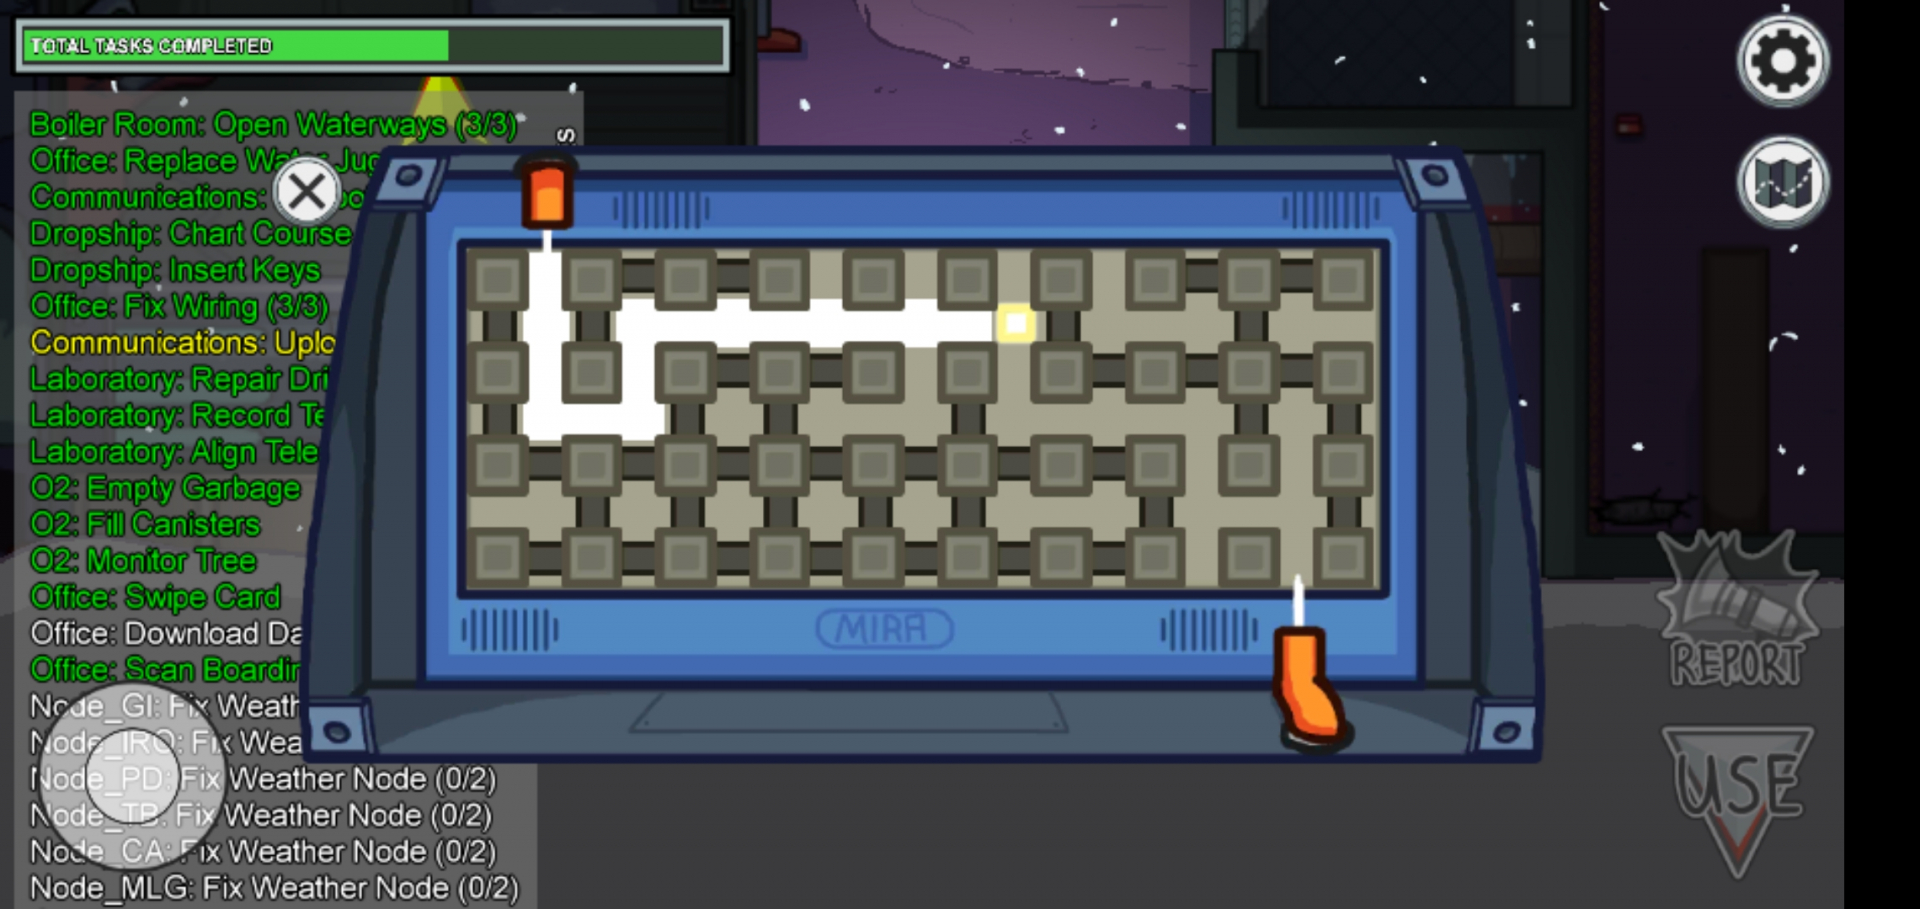
| Open Waterways |
Click to Enlarge Description:Spin the wheel and wait till the water gauge fills.. Once you've finished opening 2 of them, move to the location with the yellow arrow and spin the 3rd one. Location: Boiler Room |
| Reboot Wifi |
Click to Enlarge Description:Pull down the red lever and wait until the countdown ends. Return to the device once the countdown ends and pull the lever up to reboot the wifi. Location: Communications |
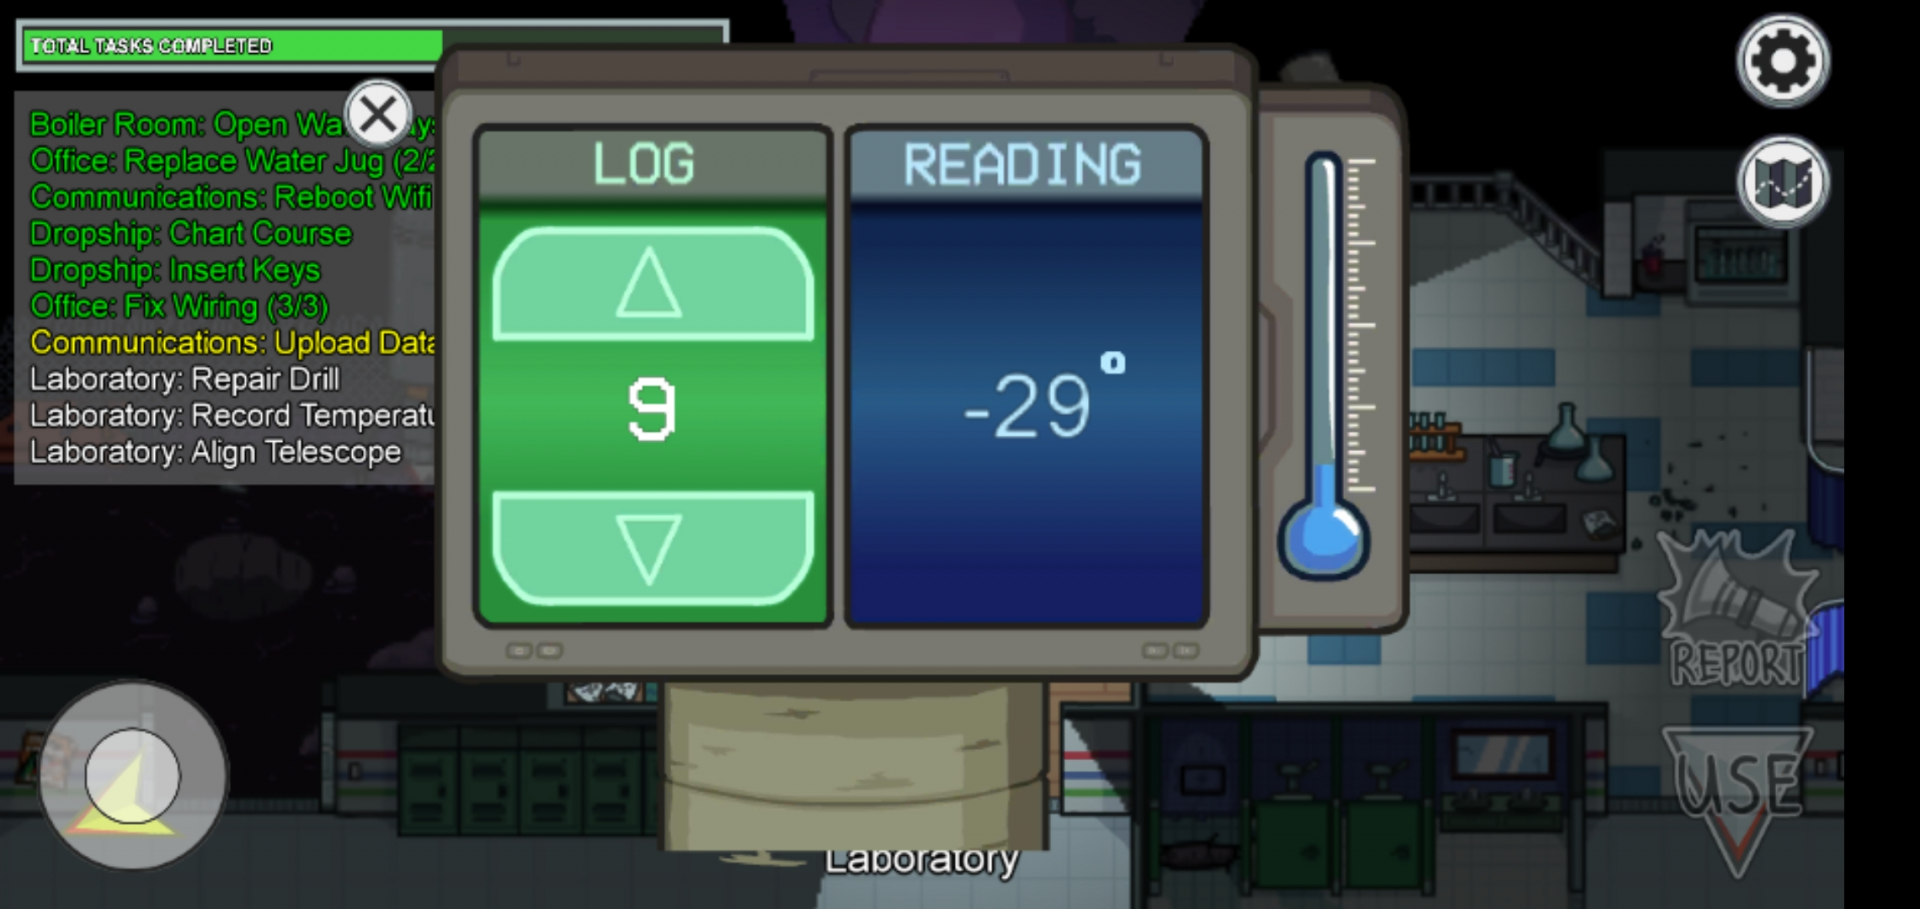
| Record Temperature |
Click to Enlarge Description:Press △ or ▽ and make the number on the Log screen the same as the number on the Reading screen. Location: Laboratory Outside |
| Repair Drill |
Click to Enlarge Description:Tap ! marks repeatedly and make all marks disappear. Location: Laboratory |
| Replace Water Jug |
Click to Enlarge Description:Press and hold the red button and fill the water jug. Then, move to the Office and repeat the same process. Location: Boiler Room → Office |
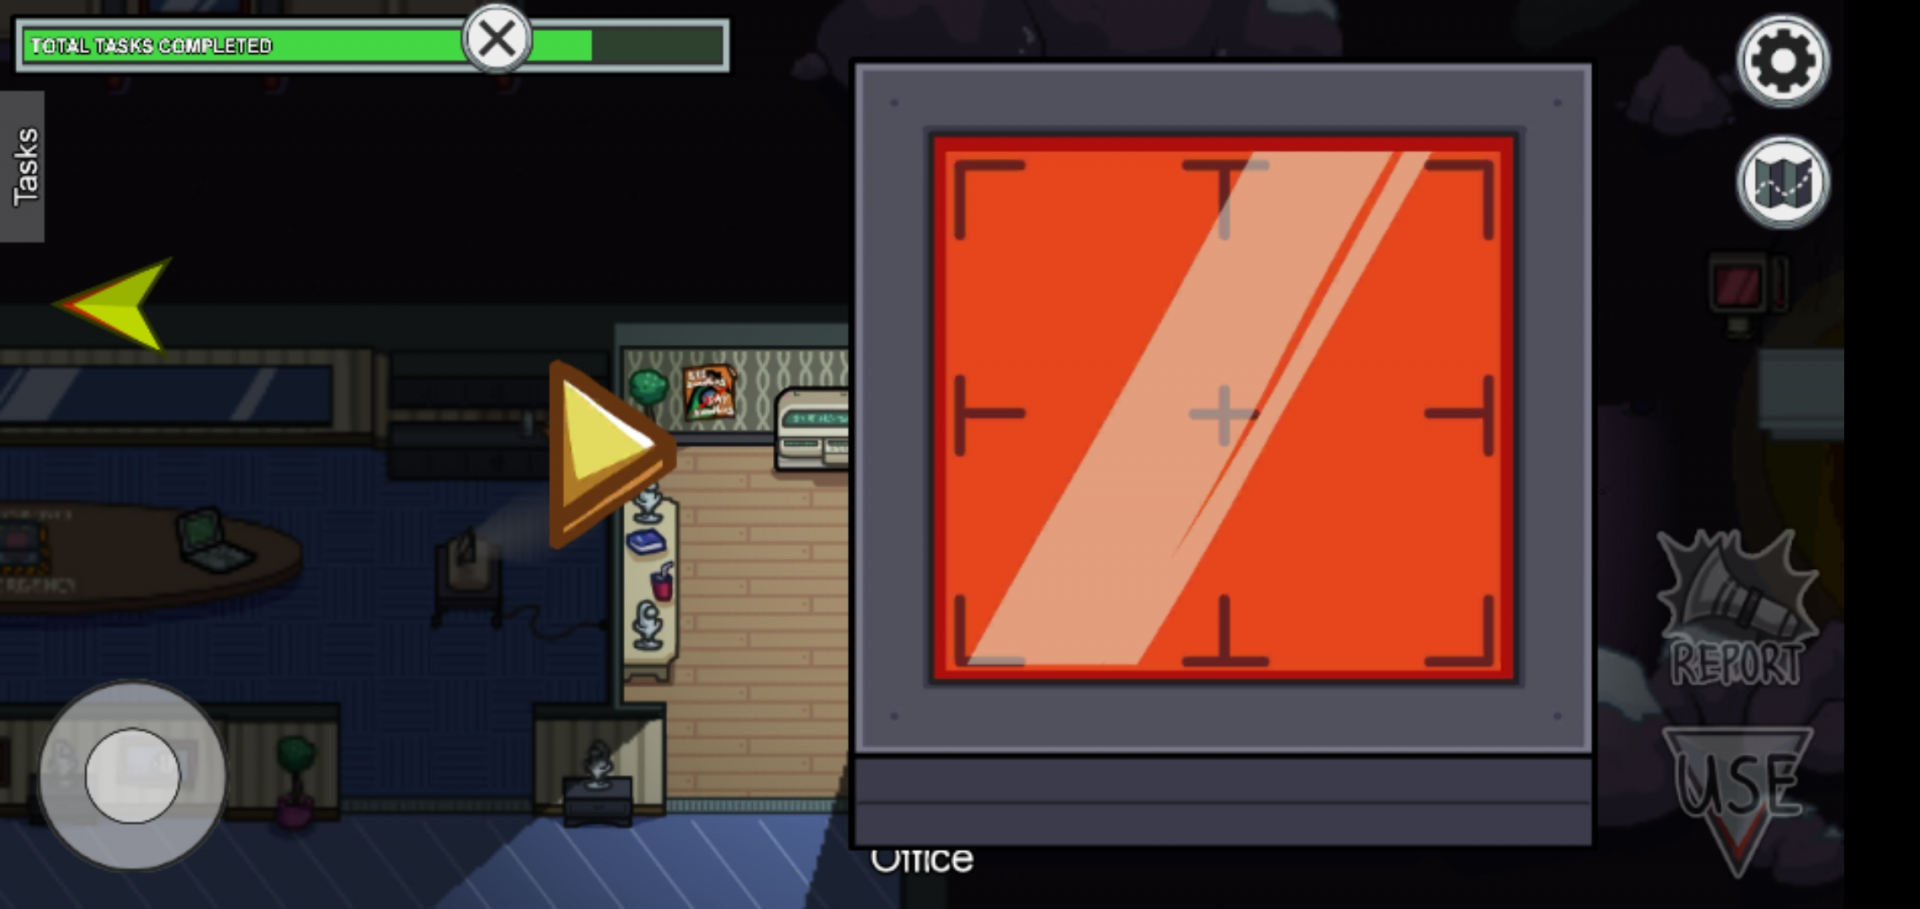
| Scan Boarding Pass |
Click to Enlarge Description:Tap the boarding pass and drag it above the red reader device. Location: Office |
| Store Artifacts |
Click to Enlarge Description:Store all artifacts in the case Location: Specimen Room |
| Submit Scan ! Visual Task ! |
Click to Enlarge Description:Stand on the platform and scan yourself. ⬆Click here to see the visual effect Location: MedBay |
| Swipe Card |
Click to Enlarge Description:Take out the card from your wallet and swipe it. Location: Office |
| Upload Data |
Click to Enlarge Description:Press the download button. Move to a different location with a yellow arrow pointing to it and upload the data. Location: Electrical -> Communications O2 -> Communications Office -> Communications Specimen Room -> Communications Weapons -> Communications |


Comments
Post a Comment